About the Project
Our team of 5 NUS students were tasked to enhance AddressBook3, a basic Command Line Interface (CLI) desktop application for the module CS2103 Software Engineering Projects. Over the past few weeks, we have morphed the desktop application into an interview productivity app, HireLah!. HireLah! is targeted to bring greater convenience to interviewers who can type quickly and prefer typing over mouse commands. Additionally, we included customised features in HireLah! to help interviewers to manage multiple interview sessions at the same time.
My role was to design and write codes in Java and FXML to create the Graphical User Interface (GUI) of HireLah!, such that the GUI is elegant and convenient to use. I will elaborate on my contributions in the following sections.
Summary of contributions
This section shows a summary of my contributions to the team project.
-
Major enhancement: Designed and implemented the UI components of HireLah!
-
What it does: It enables users to view all the information relevant to an interview, including the list of interviewees, lists of rubrics (including attributes, questions and metrics), as well as the transcript of each interviewee after an interview. The UI receives user commands after they have been parsed within the Logic component and updates according to the user’s commands via polymorphism.
-
Justification: This feature allows an user to easily navigate between and find the information that he/she needs in order to conduct an interview, without the hassle of cross-referencing various sources of information.
-
Highlights: This feature depends on the backend implementation of HireLah! and therefore requires consistent communication with the rest of my teammates in order to correctly display features implemented by them. This is not easy as I have to take into account the constraints of the UI elements and possible use cases, such as inputting long paragraphs of text or resizing the application, and ensure that the UI still displays correctly. As new features are added to HireLah!, such as the implementation of sessions, I have to update the UI accordingly as well.
-
-
Code contributed: The code that I have contributed to HireLah! can be found [here].
Other contributions
-
Project management
-
Created and managed issues during v1.3 and v1.4.
-
Reviewed pull requests of team mates.
-
Created bug reports and assigned them according to our roles. #195
-
-
Enhancements to existing features:
-
Documentation:
Contributions to the User Guide
Given below are sections I contributed to the User Guide. They showcase my ability to write documentation targeting end-users. |
Introduction
HireLah! is a productivity app that helps busy interviewers like you manage multiple interview sessions in an orderly
manner. During each interview session, HireLah! helps you to keep track of interviewee information and interview
rubrics in one central location so that you can focus on what’s important - the interview itself!
HireLah! has the following main features:
-
Manage multiple interview sessions, one for each different job position you are conducting interview for.
-
Add and modify interview rubrics for each interview session, including:
-
A list of attributes you want to look out for in an interviewee.
-
A set of questions that you would like to ask all interviewees.
-
A collection of metrics to score interviewees, allowing you to easily rank potential candidates.
-
-
Record your remarks for an interviewee during an interview, and score the interviewee based on the attributes.
-
Identify the best interviewees based on particular attributes or metrics, so that you can follow up with them.
-
Export interview transcripts for future reference.
HireLah! is optimised for interviewers who are fast typists and prefer typing over other means of input. It comes with:
-
A Command Line Interface (CLI) which allows you to access all HireLah! features by typing.
-
A Graphical User Interface (GUI) that displays the information you need to conduct an interview, with limited GUI convenience features.
About this Guide
Basic Information
This User Guide explains how you can use HireLah! to help you manage your interviews.
You may refer to Quick Start for a short tutorial on how to run HireLah! on your device and use HireLah!'s main features. Please refer to GUI Components for a breakdown of HireLah!'s GUI components. For a full walkthrough of HireLah!, please refer to [Features].
If you encounter any difficulties while using HireLah!, you can refer to [FAQ] for a list of common issues.
If you are an experienced CLI user, you can find all the HireLah! commands under [Command Summary].
Command Format
This section explains the format of commands in this User Guide:
Command Format
-
Words in
<angular brackets>are the parameters to be supplied by the user e.g. inadd interviewee <full name>,<full name>is a parameter which can be used asadd interviewee John Doe. -
Items in square brackets are optional e.g
<full name> [-aka <alias>]can be used asJohn Doe -aka Joor asJohn Doe. -
Items with
… after them can be used multiple times including zero times, unless otherwise stated e.g.[-a <attribute> -w <weight>]…can be used as,-a ambition -w 0.5,-a ambition -w 0.5 -a teamwork -w 0.1etc.
Quick Start
-
Ensure you have Java 11 or above installed in your Computer.
-
Download the latest
HireLah.jarhere. -
Copy the file to the folder you want to use as the home folder for your HireLah!.
-
Double-click the file to start the app. The following window should appear within a few seconds - this is the Session Screen, where you can create, open, or delete interview sessions:
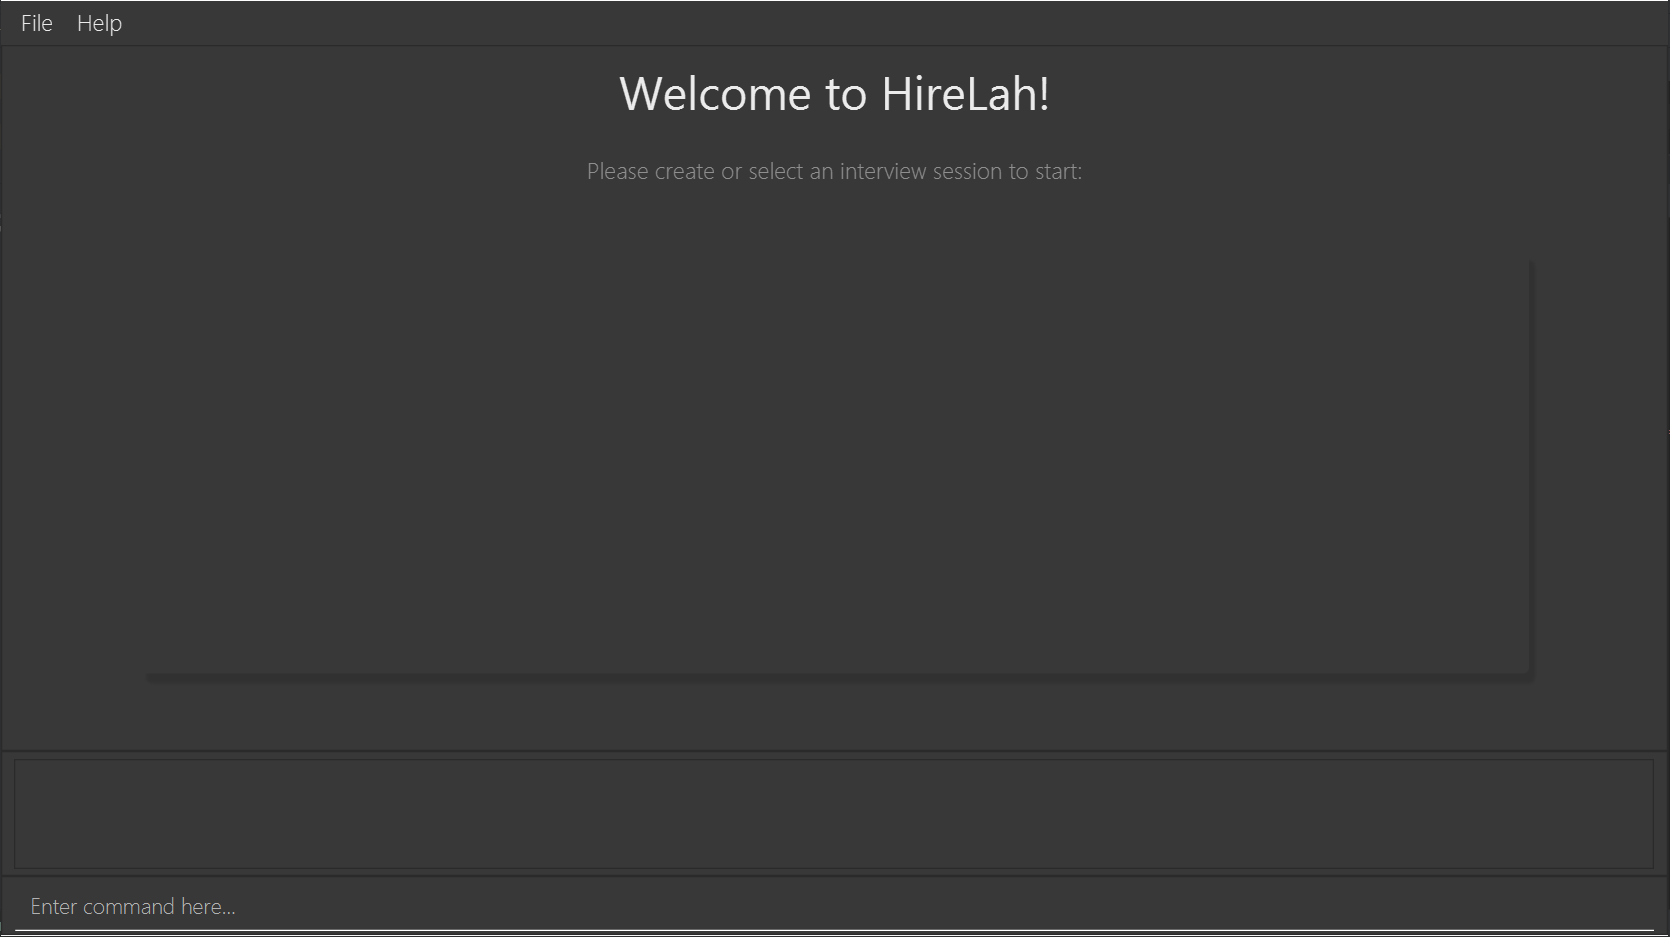 Figure 1. Image of the Session Screen
 -
Type the command in the command box and press Enter to execute it.
e.g. typinghelpand pressing Enter will open this user guide. -
Some example commands you can try:
-
newCEO Interview: creates an interview session named "CEO Interview" and opens the Interview Screen.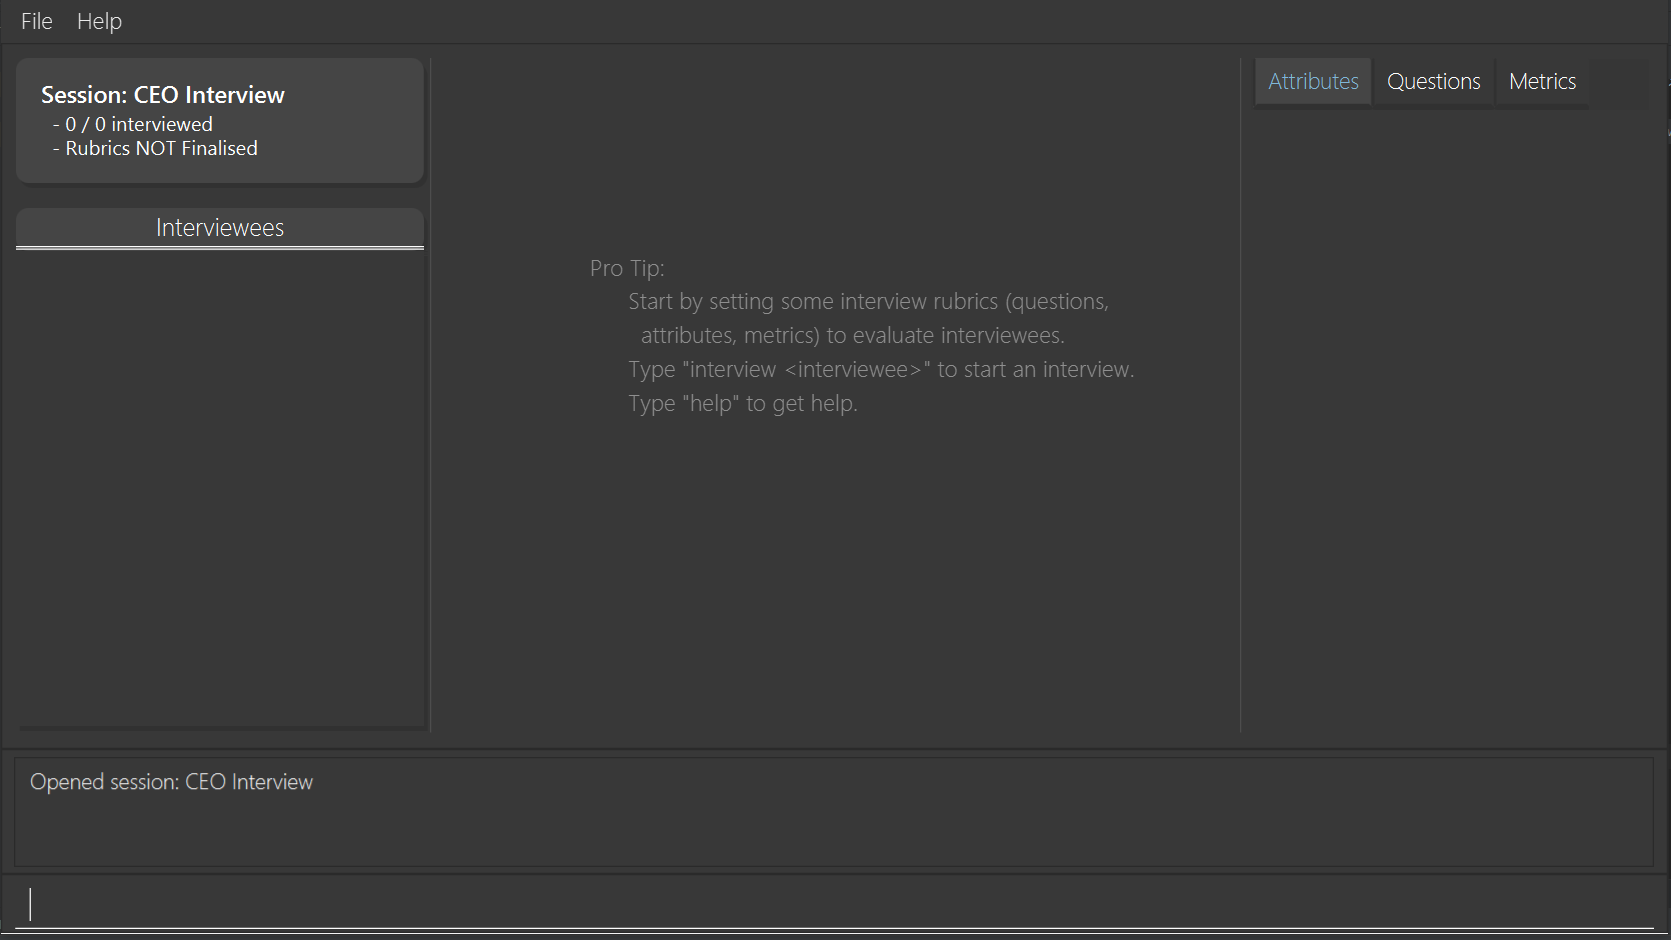 Figure 2. Image of the Interview Screen
-
-
Once you are on the Interview Screen shown above, here are some example commands you can try:
-
add intervieweeJohn Doe: adds an interviewee named John Doe to the application -
add questionHow old are you?: adds the question to the application -
exit: exits the app
-
-
Refer to GUI Components for an explanation of the GUI and [Features] for details of all the commands.
GUI Components
HireLah! consists of two main screens, the Session Screen as well as the Interview Screen, as shown below.
Session Screen
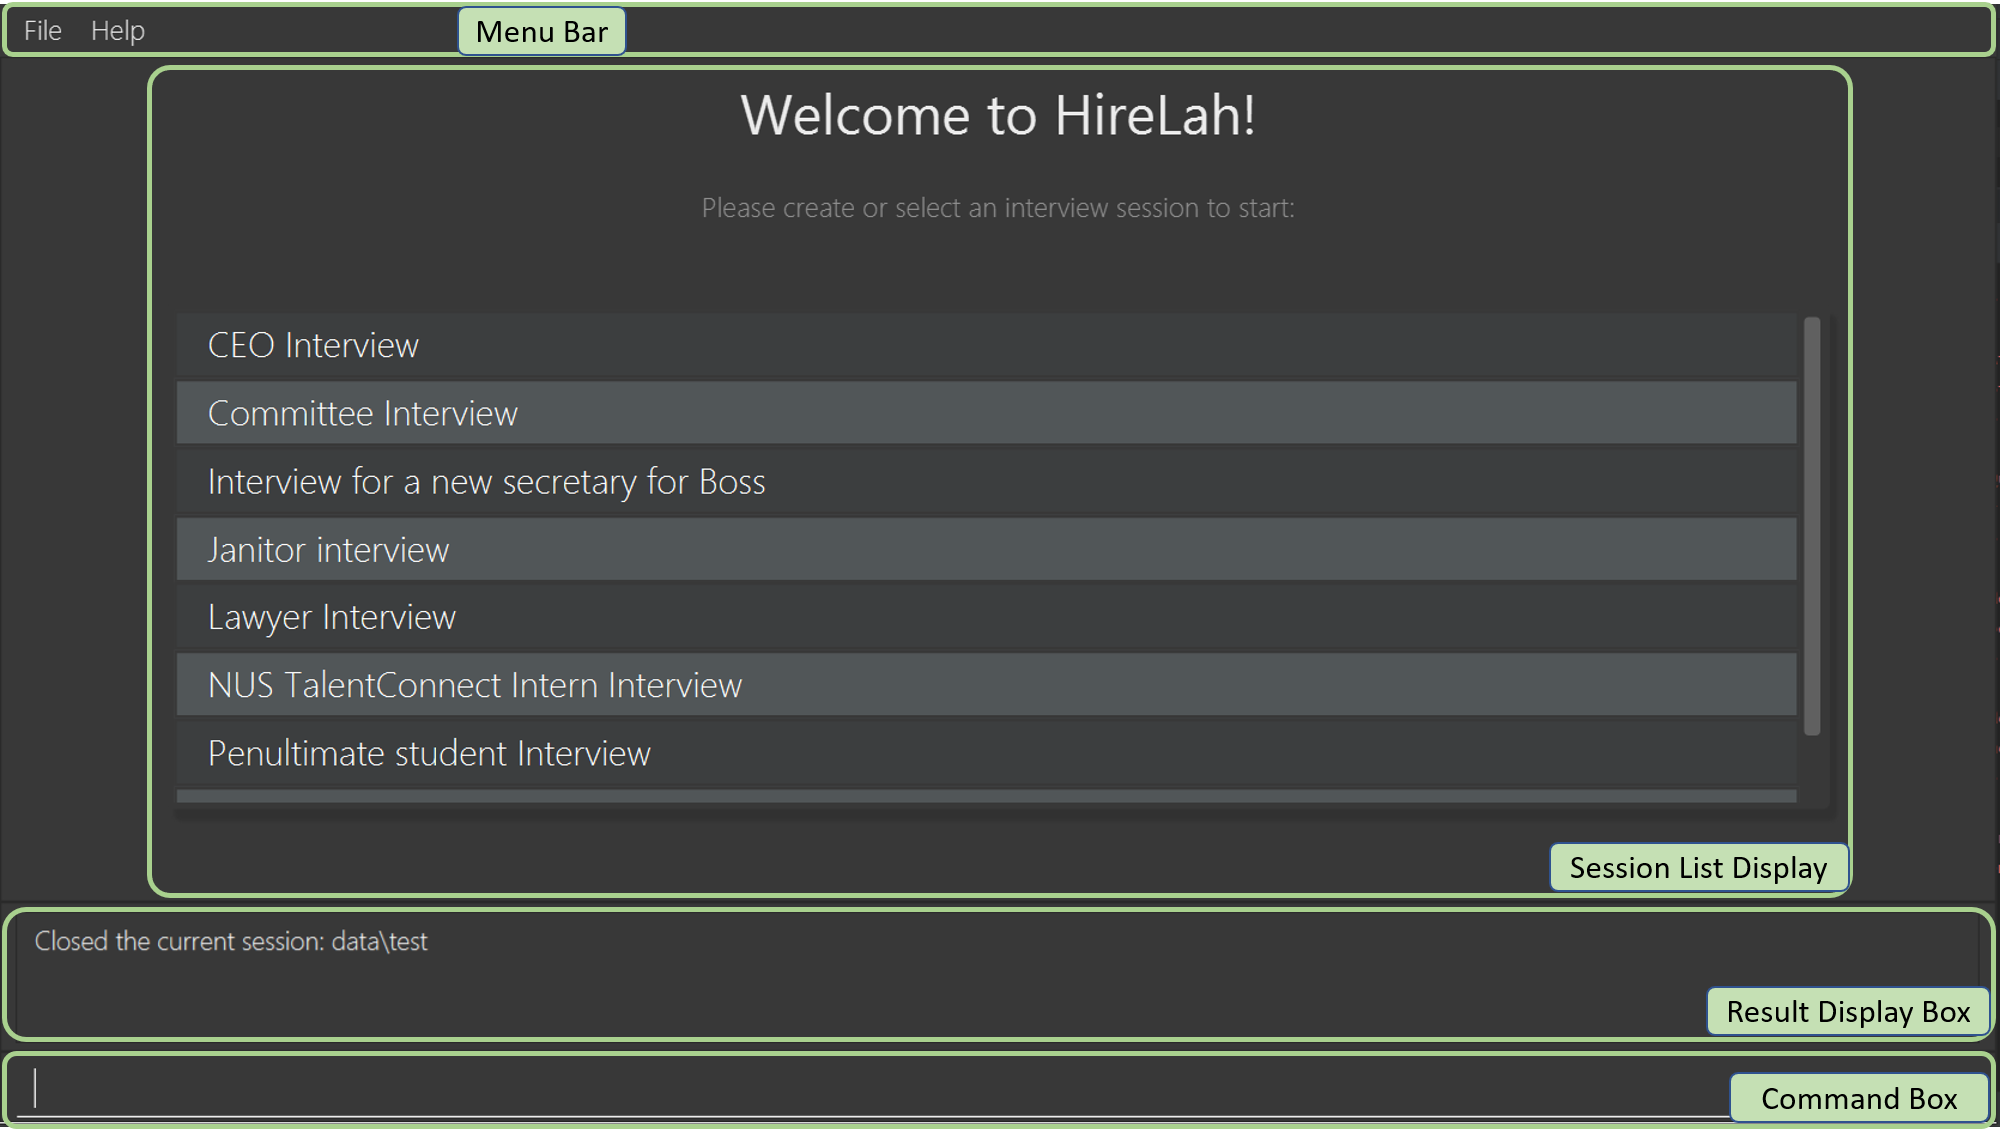
Menu Bar
You may use the Menu Bar to access this User Guide, or to exit HireLah!.
Session List Display
Displays a list of all current interview sessions that has been created using HireLah!
For more information, see [Managing Sessions].
Result Display Box
The Result Display Box displays success and error messages for your last command.
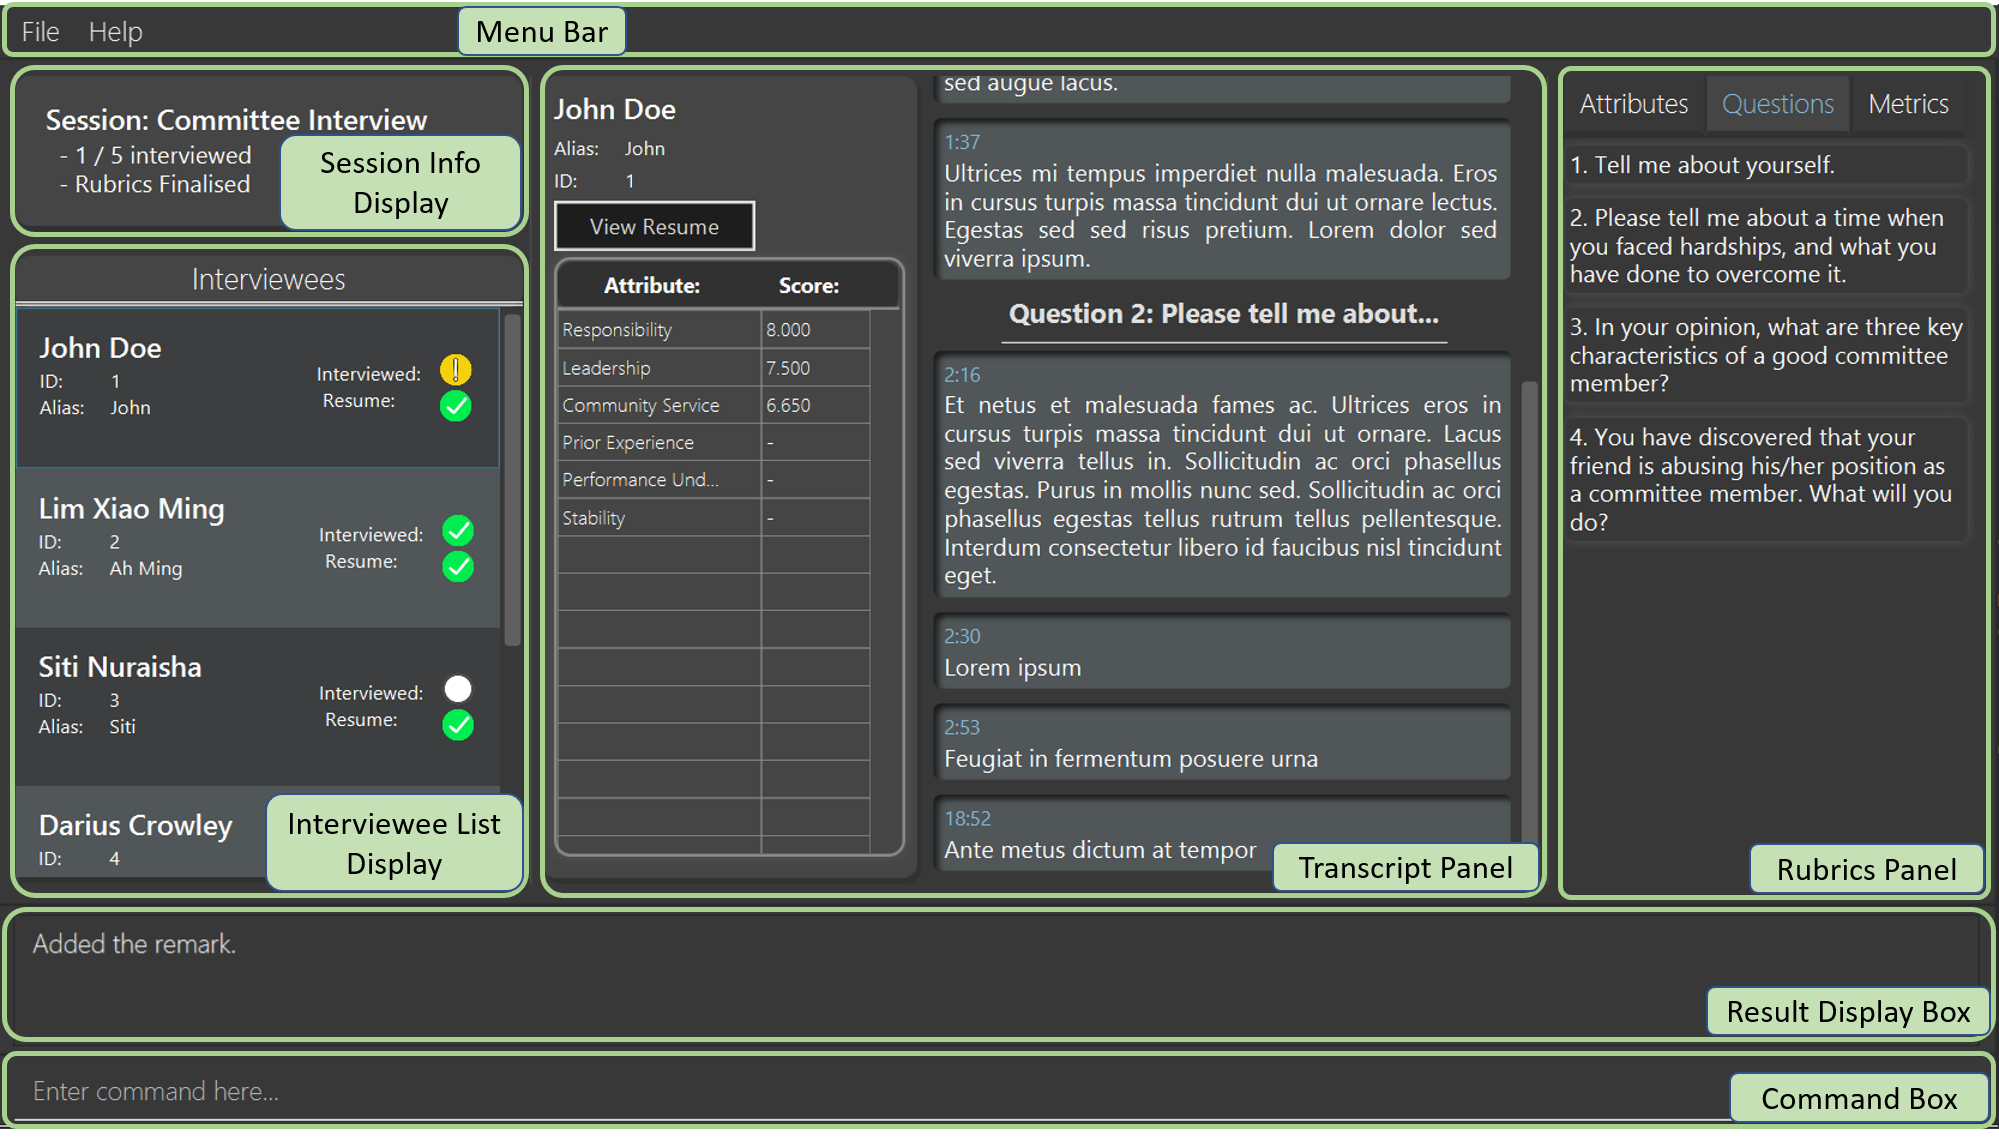
Interview Screen
Session Info Display
This panel displays a few meta information about this interview session, in order:
-
The name given to this interview session.
-
The number of interviewees that has been interviewed over the total number of interviewees.
-
Whether this session has been finalised. Refer to [Finalise Interview Attributes and Questions] for more information.
Interviewee List Display
Interviewee List Display shows the current list of interviewees. This list will display either the list of all interviewees, or a list of the best few interviewees selected based on your input ranking criteria, as shown below: (See [Find Best Candidates])
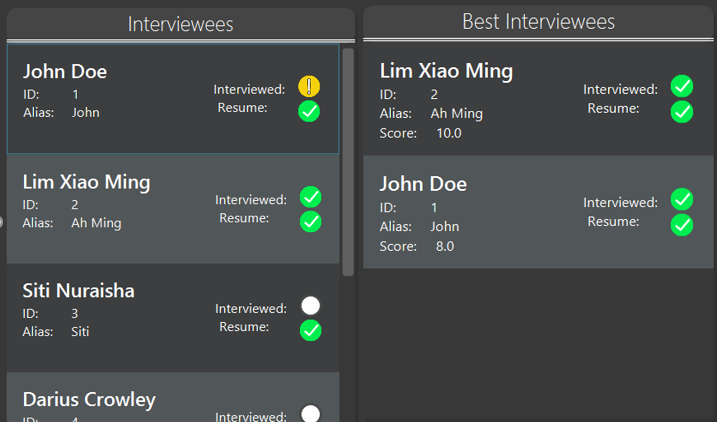
Each interviewee card contains the full name, ID and alias of the interviewee. It also shows whether the interviewee has had uploaded a resume (indicated by a green circle with a tick beside "Resume:") and the interview status of the interviewee (white circle indicates the interviewee has not been interviewed, yellow circle indicates that interview with this interviewee is currently underway/incomplete, green circle indicates that the interview with this interviewee has been completed).
In addition, if the list of best interviewees is being shown, the score of each interviewee based on the ranking criteria will be displayed on each interviewee’s card.
Transcript Panel
Transcript Panel displays the interview transcript of an interviewee. It consists of two sub-components:
-
A Detailed Interviewee Card on the left, which contains:
-
Full name, ID and alias of the interviewee.
-
A button that opens the interviewee’s resume.
-
A table showing the score assigned to the interviewee for each attribute that this interview looks out for. If an attribute has not been scored yet, the score will be shown as "-".
-
-
A Remarks List showing the time-stamped remarks entered by the user about the interviewee during the interview. The list also contains question headers, indicating that the remarks entered after it are in response to the interviewee’s answer to the particular question.
Rubrics Panel
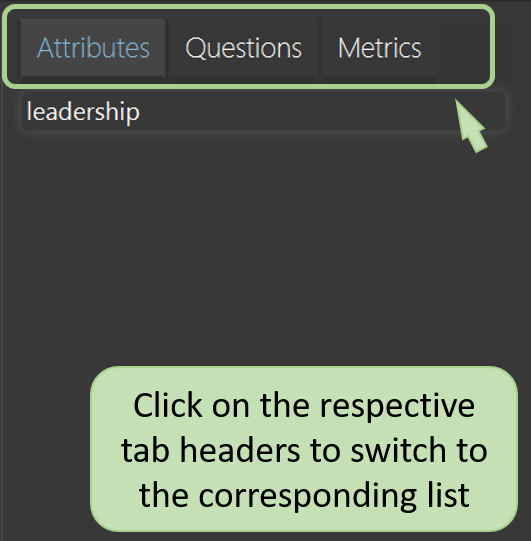
Rubrics Panel displays information about attributes, questions and metrics created for this interview session. You can easily toggle between these lists of information by clicking on the respective tab headers at the top of this Panel.
Result Display Box
Refer to Result Display Box
GUI Convenience Features
Opening an Interview Session
It might be tedious opening an interview session via the open command open <session>, as session names can be very
long. As such, we have implemented a convenient way of opening interview sessions via the GUI.
In order to open the report of an interviewee, you can simply scroll to the interview session you want to open, and double click on it!
Accessing Interviewee Resume
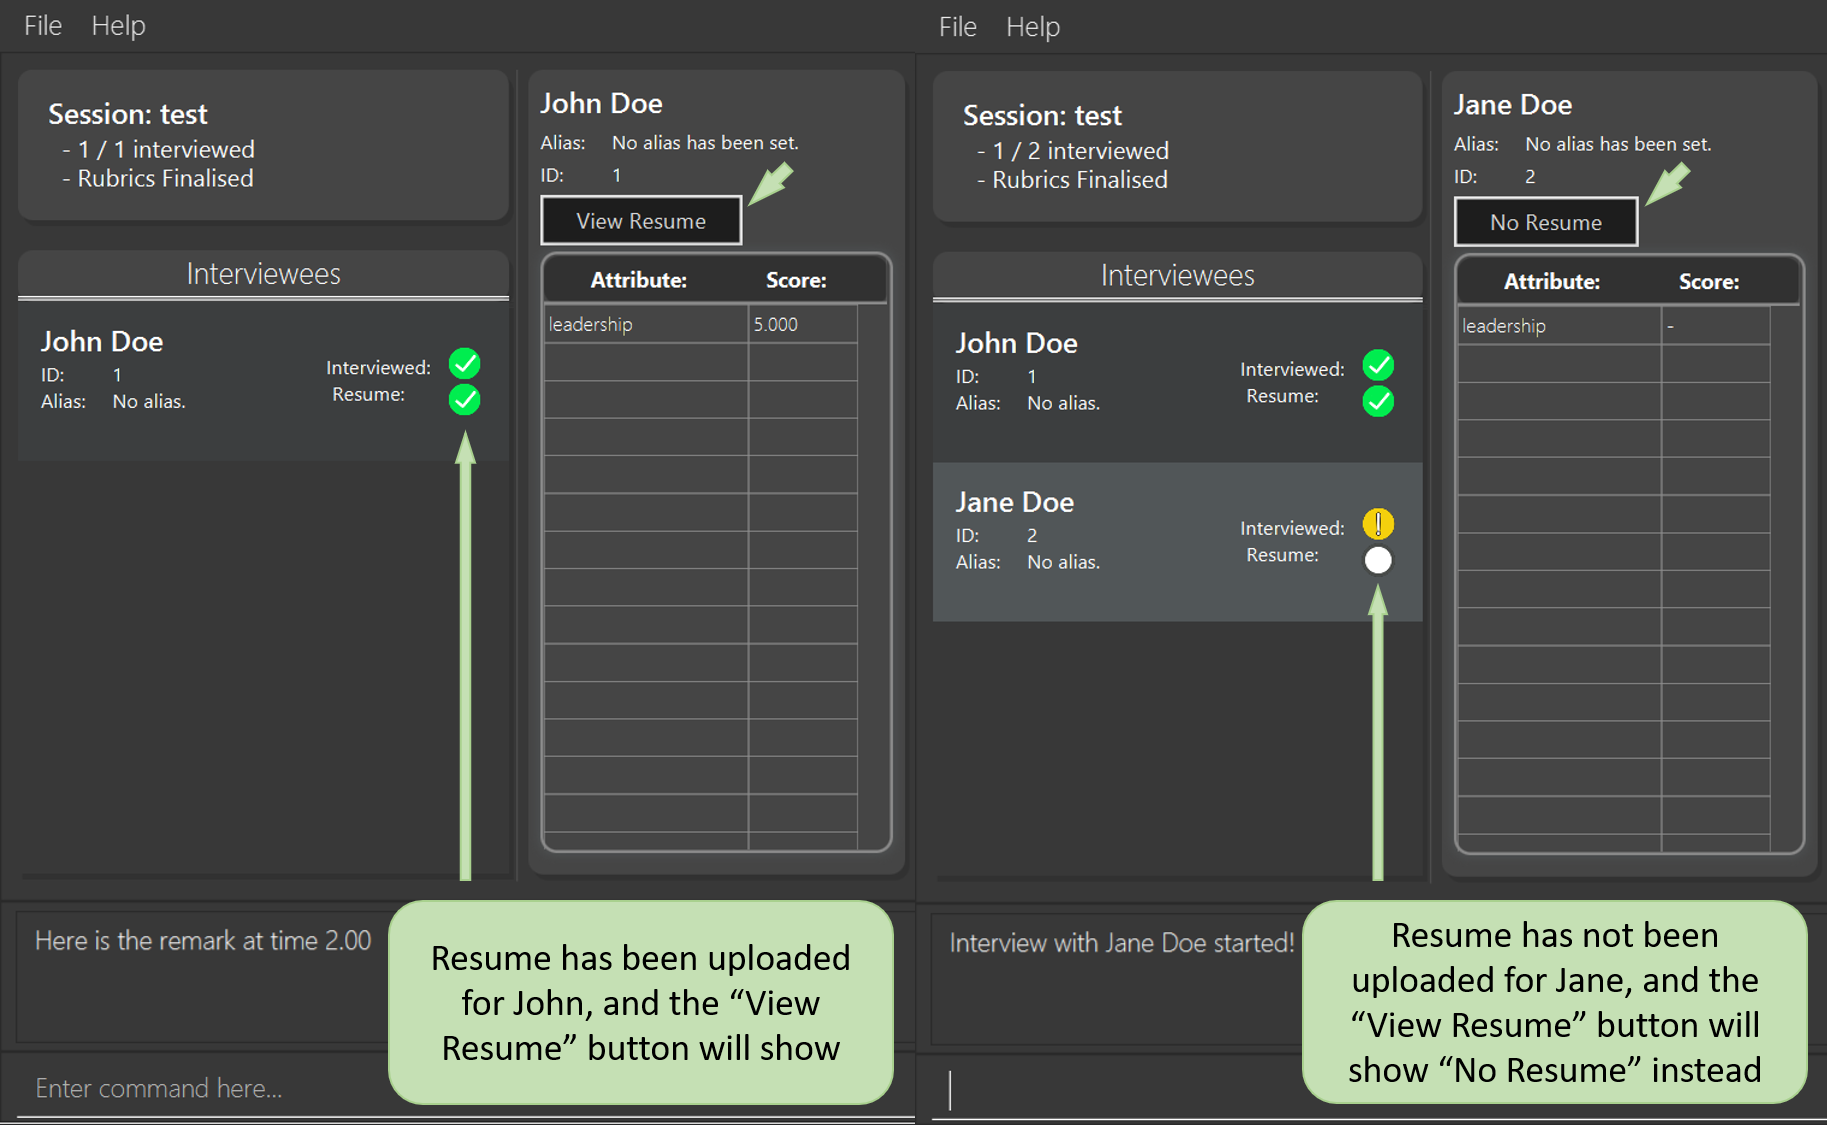
During an interview or while viewing the interview report of an interviewee, the user can open the interviewee’s resume easily by clicking on the "View Resume" button in the Detailed Interviewee Card. If no resume has been uploaded for the interviewee, the button will say "No Resume" instead, and clicking on the button will do nothing.
Keeping Track of Interview Rubrics
You may wish to refer to the attributes, questions and metrics created during an interview. As an alternative to typing the switching views commands (See [Switching views]), you may also click on the respective tab headers to view the list.
Contributions to the Developer Guide
Given below are sections I contributed to the Developer Guide. They showcase my ability to write technical documentation and the technical depth of my contributions to the project. |
UI component

API : Ui.java
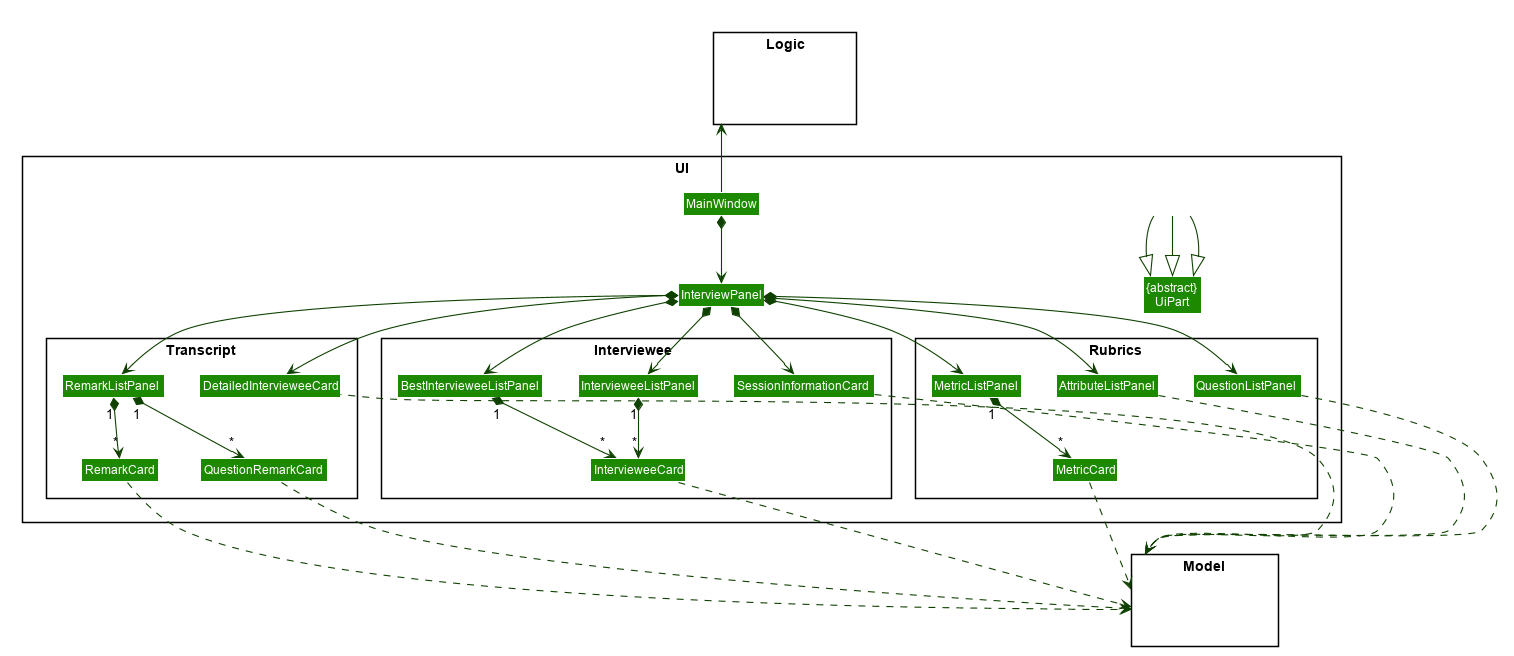
The UI consists of a MainWindow that is made up of parts e.g.CommandBox, ResultDisplay, SessionPanel,
InterviewPanel etc. All these, including the MainWindow, inherit from the abstract UiPart class.
The UI component uses JavaFx UI framework. The layout of these UI parts are defined in matching .fxml
files that are in the src/main/resources/view folder. For example, the layout of the
MainWindow is specified in
MainWindow.fxml.
The UI component,
-
Executes user commands using the
Logiccomponent through theCommandExecutorfunctional interface. -
After executing each command, performs command-specific view updates as instructed by the CommandResult returned by that command.
-
Listens for changes to
Modeldata so that the UI can be updated with the modified data.
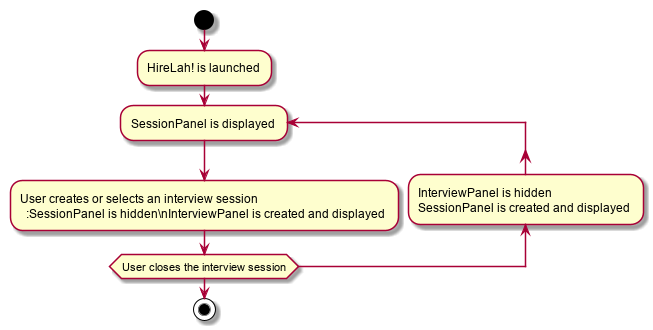
When the app is launched, SessionPanel is displayed to allow the user to manage interview sessions. When an interview
session is selected, SessionPanel becomes hidden, and the InterviewPanel is displayed to allow the user to conduct
interviews. This process is summarised in Figure 7, “Activity Diagram showing the toggling between SessionPanel and InterviewPanel”. The structure of the InterviewPanel is shown in Figure 8, “Structure of the InterviewPanel used to display an interview session”.
Updating UI elements after user commands
Description
A lot of things goes on during the interview process. As such, HireLah! needs to handle different types of input commands
from the user and update the GUI accordingly in response. AddressBook3, which HireLah! is based on, uses the CommandResult
class to achieve this. Based on our design of HireLah! however, there are three types of command outcomes that the user’s
input may give:
-
Toggle to see a different list of information, for example toggling from the
SessionPanel, which lists out the information of all interview sessions created on HireLah!, toInterviewPanel, which shows the details of one interview session. -
Scroll to a particular entry in a list. This is required for the
gotocommand, which allows the user to see an interviewee’s remarks at a particular timestamp by scrolling theRemarkListto a particular index. -
Simply printing out a message in the
ResultDisplayto show the user.
Implementation
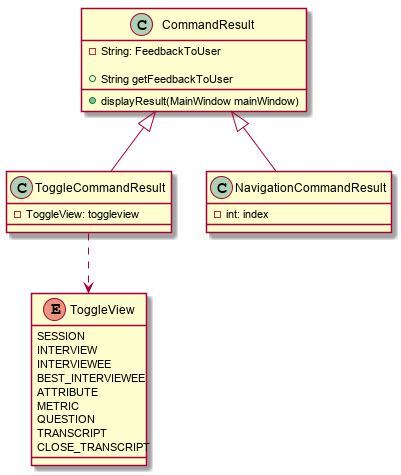
In order to handle all three types of command outcomes, we have decided to extend the original CommandResult class to
produce two new subclasses: ToggleCommandResult, which handles type 1 outcomes, and NavigationCommandResult, which
handles type 2 outcomes. The original CommandResult class is used to handle type 3 outcomes.
In addition, we have implemented the ToggleView enum, which is returned as an attribute in ToggleCommandResult to inform
the UI on the UI component to toggle to.
Given below is a class diagram to summarise the characteristics of these three CommandResult classes, as well as the ToggleView enum:
Design Considerations
Aspect: How to design and update the UI components
ToggleCommandResult also signals that the relevant UI component needs to be updated, and decisions have to be made on
how the implicated UI components should be updated
-
Alternative 1: Reinitialise the entire UI after every command
-
Pros: This will definitely update the changes required of the UI accordingly, as the new UI can be built to reflect the current state of the
Model. -
Cons: This method is extremely inefficient, and may slow down the application considerably when the user has entered a lot of information.
-
-
Alternative 2: Update only the UI component affected if necessary, for eg
IntervieweeListPanel-
Pros: This is a lot more efficient compared to Alternative 1.
-
Cons: Some commands, such as
:endwhich ends an interview with an interviewee needs multiple UI components to be updated, such asIntervieweeListPanel,RemarkListandSessionInformationCard, and this method only updatesIntervieweeListPanelas this command returns the ToggleView enum INTERVIEWEE.
-
Current Implementation: We have taken a compromise between the two approaches. UI components that are often updated together
are grouped together, such as IntervieweeListPanel and SessionInformationCard, such that they are always updated together.
In addition, we made use of Observable classes to reduce the number of times an UI component needs to be reinitialised.